Tuesday, November 30, 2010

Red Velvet Swirl Brownies

Last week I was watching Food Network with Jarret and Sunny Anderson was making Red Velvet brownies and they looked so amazing I went online and got the recipe right away. Jarret LOVES red velvet cake in fact it's one of the only cakes he actually likes so I made these for him. 


These were delicious!! I suggest if you love red velvet cake with cream cheese frosting to give these a shot. You won't be disappointed. Here's the recipe -

http://www.foodnetwork.com/recipes/sunny-anderson/red-velvet-swirl-brownies-recipe/index.html

Ingredients

  • 1 tablespoon unsalted butter, for pan

Red Velvet Brownie Layer:

  • 1 stick unsalted butter
  • 1 cup sugar
  • 1 teaspoon vanilla extract
  • 1/4 cup cocoa powder
  • Pinch salt
  • 1 tablespoon red food coloring
  • 1 teaspoon vinegar
  • 2 eggs
  • 3/4 cup all-purpose flour
  • 1/4 cup chopped toasted walnuts

Cream Cheese Layer:

  • 8 ounces cream cheese, softened
  • 1/4 cup sugar
  • 1 egg
  • 1/8 teaspoon vanilla extract
  • Special equipment: 8 by 8-inch baking pan

Directions

Preheat the oven to 350 degrees F.
Butter an 8 by 8-inch baking pan, and set aside.
Brownie layer: In a saucepan on medium heat melt the butter. Remove the butter to a large bowl and add the sugar, vanilla, cocoa powder, salt, food coloring, and vinegar, in that order, mixing between additions. Whisk the eggs in a small bowl and stir it into the cocoa mix. Fold in the flour until lightly combined. Stir in the walnuts and pour the batter into the prepared baking pan, saving 1/4 cup of the batter for the top.
Cream cheese layer: Blend together the cream cheese, sugar, egg, and vanilla in a medium bowl. Gently spread the cream cheese layer on top of the brownie batter in the pan. Dollop the remaining brownie batter over the cream cheese layer. Using a skewer or the tip of a knife, drag the tip through the cream cheese mixture to create a swirl pattern. Bake the brownies for 30 minutes. Remove to a cooling rack and allow them to cool completely before cutting


ENJOY!! 


With Love,
Cheri

Wednesday, November 3, 2010

Nutella & Oreo Cookie Filled Cupcakes

So my boyfriend loves Nutella and I thought that I'd make him something special this week :) plus we're on diets and actually having a competition as to who can lose the weight faster so I had to sabotage him a little with these cupcakes ;) 

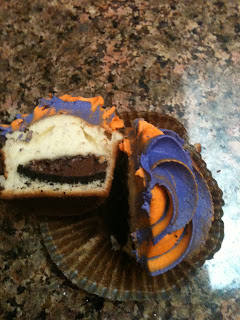
I made both a chocolate & vanilla cake because I wasn't sure which would taste better with the Nutella. We also had oreos so I asked my boyfriend to separate them and I used the cookie part in the cupcake. I put a little of the cake batter in the cupcake liner then topped the cookie with nutella and put that in the cupcake and covered it with some more batter filling it 2/3 full. Then baked at 350 deg. for 15 minutes. My oven tends to cook fairly quick so keep that in mind. I frosted the cupcakes with vanilla buttercream because it's my favorite but you could also top it with a nutella frosting -

 Cream together butter & nutella. Add vanilla. Add sugar, 1 cup at a time. Mix thoroughly. Add milk slowly. You may not need all of it. Just add milk until you get the right consistency.


I made these on Halloween so I dyed my frosting purple & orange! and the liners say trick or treat on the bottom. 


These turned out really good & tasted delicious as well. I also used the leftover oreos and put them inside a few cupcakes but those were eaten before I could get a pic! 


You have to try these if you're a nutella fan. 


With Love,
Cheri


not cupcakes, but still pretty delish - Pumpkin Brownies.

I got a random e-mail from Betty Crocker this week which I usually just delete as spam but I saw pumpkin in it and had to at least look at it. They had a recipe for pumpkin brownies and I love pumpkin & brownies so I decided right there and then I had to try it!


Now they are supposed to be kind of layered but ended up all blending together which worked just fine. 

Here's the recipe:
Pumpkin Swirl Brownies

I didn't follow it to the T. I didn't use the brownie mix suggested but they still came out delicious!! The pumpkin was not overpowering at all and the brownie & pumpkin together really worked. If you love pumpkin and brownies try this, you won't regret it! They are absolutely perfect for holiday get togethers or just because ;)

With Love,
Cheri


Sunday, October 24, 2010

Key Lime & Coconut Cupcakes

This week I decided to try out a recipe I saw on foodnetwork.com for Key Lime & Coconut Cupcakes. My boyfriend & aunt love key lime pie so I wanted to make it in a cupcake form and since my aunt & her family were coming over for dinner I figured this was the perfect opportunity :) 


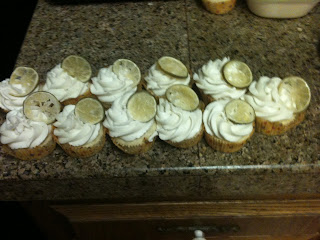
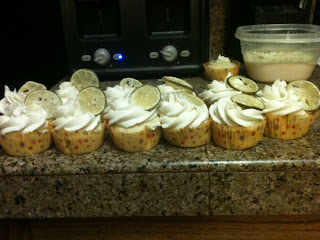
 I also made some candied lime slices for decoration. The cake was really dense where I typically make very light cakes. When I was making the cake the batter was really thick and I wasn't sure I made it right but after baking it I realized it was just a heavier cake then I normally make. It had really good flavor not too tart from the lime. The cake batter had coconut in it which I liked at first but thought that texture got old after awhile. I think I may leave out the coconut next time. But if you really like coconut I definitely suggest leaving it in there. The frosting was AMAZING! I think the frosting would also go great on a vanilla cake. 

Here are the recipes:
  • 3/4 cup (1 1/2 sticks) unsalted butter, at room temperature
  • 1 cup granulated sugar
  • 2 eggs, at room temperature
  • 1 teaspoon pure vanilla extract
  • 1 heaping teaspoon grated key lime zest
  • 1 1/2 tablespoons key lime juice (bottled or freshly squeezed)
  • 1 1/2 cups all-purpose flour
  • 1/2 teaspoon baking powder
  • 1/4 teaspoon baking soda
  • 1/4 teaspoon kosher salt
  • 1/2 cup buttermilk
  • 1 1/3 cups loosely packed sweetened coconut flakes (3.5 ounces)

For the Frosting:

  • 5 ounces good quality white chocolate, chopped into small chucks
  • 1/2 cup (1 stick) unsalted butter, room temperature
  • 3 1/2 cups powdered sugar, sifted
  • Pinch salt
  • 1/2 teaspoon pure vanilla extract
  • 1 tablespoon key lime juice (bottled or freshly squeezed)
  • 1/4 cup sour cream
  • Finely grated key lime zest, for garnish

Directions

Preheat oven to 325 degrees F.
In the bowl of an electric mixer fitted with the paddle attachment, cream the butter and sugar on high speed until light and fluffy, about 5 minutes. With the mixer on low speed, add the eggs, 1 at a time, scraping down the bowl after each addition. Add the vanilla extract, key lime zest and juice and mix well. In a separate bowl, sift together the flour, baking powder, baking soda, and salt. In 5 parts total, alternately add the dry ingredients and the buttermilk to the batter, beginning and ending with the dry. Mix until just combined. Fold the coconut into the cupcake batter.
Line a  muffin pan with paper liners and fill each liner almost to the top with batter. Bake for 25 minutes or until the tops begin to brown and a toothpick comes out clean. Remove cupcakes from oven and allow to cool in the pan for 10 minutes and then transfer cupcakes to a baking rack to cool completely.
While the cupcakes are cooling you can make the frosting. In a small heat proof bowl set over a pot of simmering water, carefully and slowly melt the white chocolate. Remove from heat and let cool until just slightly warm. Meanwhile, in the bowl of an electric mixer fitted with the paddle attachment, beat the butter until light and fluffy. With the mixer on low, gradually add the powdered sugar until well combined. Add the salt, vanilla extract, key lime juice, and sour cream and mix until very smooth. Add the melted white chocolate and mix just until incorporated.

Overall they tasted very good and I definitely suggest for people who like coconut & key limes. This frosting turned out so great that I'm definitely using it in the future even without the key lime cake. 

Enjoy!


With Love,
Cheri


Sunday, October 17, 2010

Dark Chocolate & Bacon Cupcakes

Today has been a beautiful rainy day here in Northern California and I am loving it so I decided to make my boyfriend some Dark Chocolate & Bacon Cupcakes. I saw the recipe on this site www.allrecipes.com and knew I had to give it a try. Allrecipes.com is probably my favorite recipe webpage I've made probably 50+ recipes from there and almost all of them come out amazing. Anyways, back to the cupcakes... 


Here's the recipe:

Ingredients

  • 12 slices bacon
  • 2 cups all-purpose flour
  • 3/4 cup unsweetened cocoa powder
  • 2 cups white sugar
  • 2 teaspoons baking soda
  • 1 teaspoon baking powder
  • 1/2 teaspoon sea salt
  • 2 eggs
  • 1 cup cold, strong, brewed coffee (I used Disney Blend from my recent trip to disneyland!)
  • 1 cup buttermilk
  • 1/2 cup vegetable oil
  • 1 tablespoon unsweetened cocoa powder, for dusting

Directions

  1. Preheat oven to 375 degrees F (190 degrees C). Place bacon in a large, deep skillet. Cook over medium-high heat until evenly brown. Drain, crumble and set aside.
  2. In a large bowl, stir together the flour, 3/4 cup cocoa powder, sugar, baking soda, baking powder and salt. Make a well in the center and pour in the eggs, coffee, buttermilk and oil. Stir just until blended. Mix in 3/4 of the bacon, reserving the rest for garnish. Spoon the batter into the prepared cups, dividing evenly.
  3. Bake in the preheated oven until the tops spring back when lightly pressed, 20 to 25 minutes. Cool in the pan set over a wire rack. When cool, arrange the cupcakes on a serving platter. Frost with your favorite chocolate frosting and sprinkle reserved bacon crumbles on top. Dust with additional cocoa powder.


These cupcakes were simple and tasted AMAZING!! I just love how they are so different from your typical cupcake. The batter was soo good that I think from now on I'm going to use this as my basic chocolate cake recipe minus the bacon. 

Top them with your favorite chocolate frosting (not too much though!) and top with crumbled bacon or a small strip of bacon. 


The recipe makes 24 regular sized cupcakes. 


The boyfriend whose normally not too big on cake in general really enjoyed these.. I think it's because of the bacon :) 

Ladies, if you want to impress your man make him some of these and he will love you forever ;)

I think my next attempt will be Key Lime Cupcakes since Jarret likes key lime pie so much I want to see if I can make it even better with a cupcake.


With Love, 
Cheri

Thursday, October 14, 2010

Little Mermaid Cake

For my cousin whose also my best friend's 21st birthday I made her a little mermaid cake. We grew up together watching this movie and we both love it so I was really looking forward to making it for her. 


The cake itself is a french vanilla cake and the filling is rainbow chip frosting by Betty Crocker 
it's both mine & my cousins favorite frosting. We've literally bought it just to eat it out of the tub it's that good. The frosting is my basic buttercream. The shells are made with white chocolate & a shelly candy mold I got at Michaels. I also put some gold edible glitter on the tops of the shells so they shined a little. I covered the cake board with a pink little mermaid wrapping paper. I also made about 24 cupcakes to go with the cake that were in little mermaid liners & topped with flounder & seashell edible icing decorations.

Cupcake liners:

Flounder & Seashell decorations.

I loved making this cake and luckily my cousin loved it too. She told me for her wedding she wants me to make a little mermaid wedding cake topped with Ariel & Eric so hopefully I'll get to do that one day too ;)


With Love,
Cheri

Thursday, October 7, 2010

Rainbow Cupcakes - inside


New Cookbook!

While at Disneyland I saw this cookbook called "Delicious Disney Desserts" and had to buy it. I plan to make some of the recipes in it and post about them here on my blog. Hopefully I will get a chance to make one soon! I'll post pics of them soon.

They have some great sounding recipes in there like.. Pina Colada Bread Pudding, Brownie Cheesecake, Maple Creme Brulee, Honey Crunch Cake, Bourbon Pecan Pie, and more!


That's it for now!

With Love,
Cheri

Monday, October 4, 2010

Disneyland @ Halloweentime.

So I'm at Disneyland this weekend with Jarret. It has been a ton of fun although Saturday was extremely crowded and we ended up leaving the park because of the heat & crowds. We went into the candy shop on Main St and they had the cutest candy apples so I had to share them..
Adorable! They had a bunch of different ones but I thought this was the best. They also made this pumpkin fudge and it was amazing! I need to figure out how they did that and when I do I'll post the recipe here ;)

Just wanted to post a quick update!

With Love,
Cheri

Thursday, September 30, 2010

Peanut Butter Chocolate Cupcakes

So for my step-dads birthday earlier this year I made him peanut butter & chocolate  cupcakes after his favorite candy. It was chocolate cake with peanut butter frosting & chocolate frosting. The cupcakes were filled with a mini reeses and also topped with 1/2 of one.


Sorry for the photos. The coloring is totally off. And I forgot to cut one open and take a pic of the reeses inside.

A good recipe is: Hershey's Perfectly Chocolate, Chocolate Cake.
  • 2 cups sugar
  • 1-3/4 cups all-purpose flour
  • 3/4 cup HERSHEY'S Cocoa
  • 1-1/2 teaspoons baking powder
  • 1-1/2 teaspoons baking soda
  • 1 teaspoon salt
  • 2 eggs
  • 1 cup milk
  • 1/2 cup vegetable oil
  • 2 teaspoons vanilla extract
  • 1 cup boiling water
Directions:
1. Heat oven to 350°F. Grease and flour two 9-inch round baking pans.

2. Stir together sugar, flour, cocoa, baking powder, baking soda and salt in large bowl. Add eggs, milk, oil and vanilla; beat on medium speed of mixer 2 minutes. Stir in boiling water (batter will be thin). Pour batter into prepared pans.

3. Bake 30 to 35 minutes or until wooden pick inserted in center comes out clean. Cool 10 minutes; remove from pans to wire racks. Cool completely.  10 to 12 servings.

VARIATIONS:
ONE-PAN CAKE: Grease and flour 13x9x2-inch baking pan. Heat oven to 350° F. Pour batter into prepared pan. Bake 35 to 40 minutes. Cool completely. Frost.

THREE LAYER CAKE: Grease and flour three 8-inch round baking pans. Heat oven to 350°F. Pour batter into prepared pans. Bake 30 to 35 minutes. Cool 10 minutes; remove from pans to wire racks. Cool completely. Frost.

BUNDT CAKE: Grease and flour 12-cup Bundt pan. Heat oven to 350°F. Pour batter into prepared pan. Bake 50 to 55 minutes. Cool 15 minutes; remove from pan to wire rack. Cool completely. Frost.

CUPCAKES: Line muffin cups (2-1/2 inches in diameter) with paper bake cups. Heat oven to 350°F. Fill cups 2/3 full with batter. Bake 22 to 25 minutes. Cool completely. Frost. About 30 cupcakes. 
 
 
*** to add the mini reeses cup to the cupcake once you fill the cupcake liner push a mini reeses into the center of the cupcake & bake ***
 
For the frosting I used a buttercream chocolate:
 
1/2 c shortening
1/2 c butter (softened)
3/4 cup cocoa
1 1/2 tsp vanilla extract
4 c powdered sugar
3-4 tablespoons of milk (add more for thinner consistency)
 
Cream together butter & shortening. Add cocoa & vanilla extract and mix thoroughly. Add sugar one cup at a time. If it starts getting too thick begin adding milk. Mix in milk until light and fluffly. If not using right away refrigerate in an airtight container. This icing can be refrigerated for 2 weeks. Just make sure to re-mix before using.
 
I also made a peanut butter frosting:
 
1/2 c. butter (1 stick, softened)
1 c. peanut butter
2 c. powdered sugar
3-4 tbsp of milk.
 
Cream together butter & peanut butter. Gradually mix in powdered sugar 1/2 cup at a time until fully incorporated. When it starts to get thick add 1 tbsp of milk at a time until you get your desired consistency. Beat for 3 minutes to get it nice & fluffy.
 
I then put half the chocolate frosting & half peanut butter into an icing bag & frosted the cupcakes. I then chopped the chocolates in half & placed one on each cupcake.
 
They turned out great! My stepdad said it was the best cupcake he's ever had & already asked for them again on his next birthday :)
 
With Love,
Cheri


First Stacked Cake

About a year ago I made my sisters 16th Birthday Cake and she really wanted a zebra cake and I wasn't sure how to do it. It was my first time doing a stacked cake & a first time using fondant..

Here's how it turned out:


My sisters favorite colors are purple & red so I wanted to use those. The red layers are fondant. The black "zebra" stripes are fondant as well.. The purple is buttercream.

I used marshmallow fondant from here:

This stuff gets very difficult to stir once you get all the marshmallow in. At least you'll get a great arm exercise.

Jarret helped me so much with this cake and without him I'm sure it would've been a nightmare. 


With Love,
Cheri

Mint Chocolate Cupcakes

Awhile back I made these Mint Chocolate Cupcakes which were amazing. They are one of my all time favorites. Great for those people who love mint chocolate chip ice cream.


I used a basic chocolate cake recipe and added mini chocolate chips to it.

Stolen from: http://allrecipes.com/Recipe/Extreme-Chocolate-Cake/Detail.aspx
The recipe above includes a frosting recipe which I didn't use. I just used my buttercream recipe and added peppermint extract & mint green food coloring to it.

Buttercream:
1/2 c shortening
1/2 c. butter
1 1/2 tsp vanilla extract
4 c. powdered sugar
3-4 tbsp milk
a few drops of mint extract
few drops mint green food coloring

Cream together butter & shortening. Add vanilla & mix. Then add powder sugar 1 cup at a time when it starts getting too thick add in a tablespoon of milk and mix. If still too thick add more milk until you reach your desired consistency. If it gets too thin because you added to much milk just add more powdered sugar. Then add a couple drops of mint extract.. start out small and taste. If it's not minty enough add more. You don't want it to be overpowered by the mint taste. Then add the food coloring & mix until you get your desired color.

Frost the cupcakes :)

I then added mini chocolate chips to the top or you could add an mint chocolate candy to the top for decoration.

Then.. ENJOY!

With Love,
Cheri

Rainbow Cupcakes

I just made these yesterday for my little sisters 17th birthday. She loves rainbows and is just a happy and fun person so I wanted to capture that.


This inside of these are also rainbow. I just didn't cut them open because there for her party this weekend. I'll get a photo once they are being eaten :)

So to make these I used a basic white cake recipe:

1 c. white sugar - granulated.
1/2 c. butter (1 stick)
2 eggs
2 1/2 tsp vanilla extract
1 1/2 cup all purpose flour
1 3/4 tsp baking powder
1/2 c. milk

Make sure to pre-heat your oven to 350 deg.

In a mixing bowl cream together the butter & sugar. Beat in the eggs one at a time & then add the vanilla. In another bowl combine flour & baking powder and then add to the creamed mixture & mix until all is combined. Then add milk until the batter is smooth (no lumps!)

Also if using a cake pan make sure it's greased and floured so your cake won't stick!

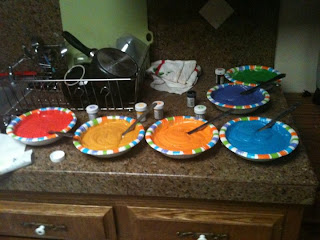
I then divided the cake batter evenly into 6 bowls. I used paper bowls to avoid dishes since I hate doing dishes. I then added food coloring to each bowl: Red, Orange, Yellow, Green, Blue, Purple. I used the wilton icing gel but you can use whatever you prefer.

I lined my cupcake pan with red foil liners and then begun layering the cake batter. I spooned into each cupcake liner a bit of purple frosting then smoothed it out and continued with blue, green, orange, yellow and topped it off with red. My awesome boyfriend helped me out by doing a whole cupcake pan by himself. And in truth his came out a little better then mine! Anyways...Bake for 20 min. This all depends on your oven though.. I'd set a time for 18 min and check on them & if they are not done continue cooking. Shouldn't take more then 25 min at the most.

I then made some basic buttercream:
1/2 c. shortening
1/2 c. butter
1 1/2 tsp vanilla extract (you can use 1 tsp vanilla extract but I like the vanilla taste so I use a little bit more)
4 c. sifted powder sugar
3-4 tbsp milk (the amount of milk you use depends on what consistency of icing you are trying to achieve for a thinner icing use more milk for a thicker use less)

1st- cream together shortening & butter then add vanilla & mix well. Begin adding sugar 1/2 cup to 1 cup at a time. Make sure to scrape down the sides & bottom of the bowl so everything is getting mixed in. Keep adding sugar until all 4 cups are incorporated. I then add milk. I usually use about 3 tablespoons. You can also add the milk in after each addition of sugar if you prefer.

I then divided the frosting evenly between 6 bowls, dyed it Red, Orange, Yellow, Green, Blue, Purple & threw it all into a piping bag and frosted the cupcakes.


These cupcakes were super messy but a lot of fun and I think they look amazing but that is just my biased opinion ;)


With love,
Cheri

About me.

Hi!

I wanted to take a minute and introduce myself and kind of explain what I plan to do with this blog. My name is Cheri and I love baking.. cupcakes especially. I'm 23 and own my own business selling office furniture and in the meantime as a hobby I bake. Mostly for family events or friends or just for fun. I usually drag my boyfriend into helping me bake and he's actually pretty good at it. His name is Jarret. This blog is for fun & to share my baking experiences with you. I've never taken any type of cooking class or cake decorating class and I am in no way a professional! I just love cupcakes! So I'll post pics & recipes of our current baking adventures and hopefully inspire some of you.

With Love,
Cheri